GARDENING
How to make an irrigation system that anyone can make
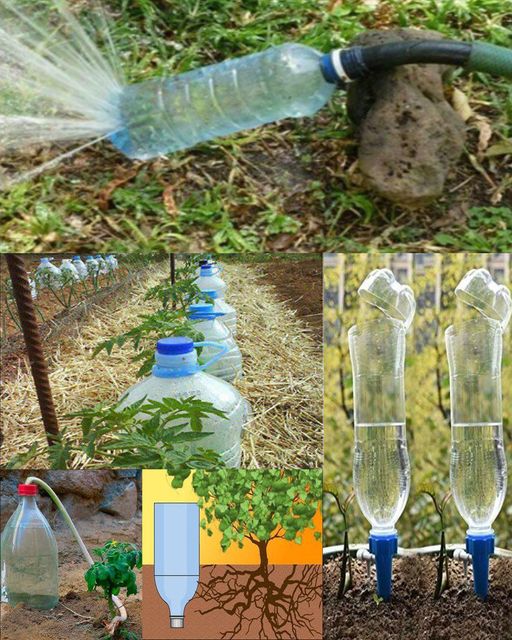
In regions where water is scarce, efficient irrigation systems can be a game-changer for farmers and gardeners alike. However, intricate irrigation setups often come with a hefty price tag, making them inaccessible to many. But what if there was a solution that not only conserves water but also repurposes everyday items? Enter the DIY irrigation system using plastic bottles – a simple yet effective way to ensure your plants receive the water they need without breaking the bank.
Why Plastic Bottles?
Plastic bottles are readily available, inexpensive, and versatile. By upcycling these ubiquitous containers, we can create a sustainable irrigation system that reduces waste while keeping plants healthy. Moreover, this method requires minimal tools and expertise, making it accessible to anyone, regardless of their background or experience in gardening.
Materials Needed:
Plastic bottles (various sizes)
Scissors or utility knife
Drill or hammer and nail
Hose or tubing (optional)
Water source
Step-by-Step Guide:
- Prepare the Bottles:
Collect plastic bottles of different sizes – the number will depend on the size of your garden or the area you wish to irrigate. Remove the labels and clean the bottles thoroughly to ensure they’re free from any residue. - Create Holes:
Using scissors or a utility knife, carefully cut holes in the bottom half of each bottle. These holes will serve as outlets for water to drip out. Make sure the holes are small enough to regulate the flow of water. - Dig Trenches:
Decide where you want to place your irrigation lines and dig shallow trenches accordingly. The trenches should be slightly sloped to ensure proper drainage. - Install the Bottles:
Place the bottles in the trenches with the holes facing downwards. Position them evenly along the trench, spacing them based on the water requirements of your plants. You can bury the bottles partially to stabilize them. - Connect the Bottles (Optional):
If you have multiple rows of bottles or a larger garden, consider connecting them with a hose or tubing. This will ensure a more uniform distribution of water throughout the irrigation system. - Test the System:
Before covering the trenches with soil, test the irrigation system to ensure everything is working correctly. Fill the bottles with water and observe how the water drips out of the holes. Adjust the flow rate by enlarging or adding more holes if necessary. - Cover and Monitor:
Once you’re satisfied with the setup, cover the trenches with soil, leaving only the openings of the bottles exposed. Monitor the system regularly to ensure it’s delivering adequate water to your plants. Adjust the placement and flow rate of the bottles as needed.
Benefits of Using Plastic Bottle Irrigation:
Cost-Effective: Plastic bottles are inexpensive and widely available, making this irrigation system incredibly cost-effective.
Water Conservation: By delivering water directly to the roots of plants, this system minimizes water wastage through evaporation or runoff.
Accessibility: Anyone can create this irrigation system with basic household tools and materials, regardless of their gardening experience.
Sustainability: Repurposing plastic bottles for irrigation reduces waste and promotes sustainability in gardening practices.
In conclusion, creating an irrigation system using plastic bottles is a simple yet impactful way to conserve water, minimize waste, and promote sustainable gardening practices. By harnessing the power of everyday materials, we can empower individuals and communities to cultivate thriving gardens while preserving precious resources for future generations.